How to animate in roblox studio
Как сделать анимацию в Роблокс
Из этой статьи вы узнаете о том как можно сделать простую анимацию в Роблокс используя Roblox Studio. Отталкиваясь от этого примера вы сможете самостоятельно создавать более сложные анимации и использовать их в собственных проектах.
Пошаговая инструкция по созданию анимации

2. В окне предпросмотра появиться выбранная модель.

3. Для того что бы создать анимацию, необходимо нажать кнопку «Animation Editor» и в появившемся интерфейсе кнопку «Create»

4. Откроется вкладка анимирования персонажа. Первым делом выставим приблизительное время анимации в секундах.

5. Если кликнуть по какой то части тела появиться визуальный джойстик с помощью которого можно вращать часть тела в той или иной плоскости.

6. Выставите ползунок на timeline на ноль и понажимайте на все части тела которые хотите анимировать для того что бы задать начальный чекпоинт положения частей тела. Если на timeline появился белый кристаллик значит вы все сделали правильно и программа запомнила начальное положение конечности.

7. Перетяните ползунок на timeline на 1 секунду вперед и измените положение любой конечности, например руки (сделаем анимацию махания).

8. Создайте на timeline чекпоинты изменения положения руки так, что бы это было похоже на приветственное махание, а в самом конце вставьте чекпоинты из нулевой отметки (их можно скопировать Ctrl + C и вставить Ctrl + V).

9. Если нужно зациклить анимацию нажмите кнопку в виде закрученной стрелочки (смотри скриншот).

10. Что бы сохранить анимацию нажмите «File» — «Export»

11. В открывшемся меню выберите «Create New»

12. Введите название для анимации и описание (желательно на английском) и нажмите Finish.

13. Появиться окно со ссылкой на анимацию. Сохраните цифровой код id перед /redirect он нам еще понадобиться.

14. Свои анимации можно посмотреть во вкладке «Create» — «Animations»

15. Для того что бы присоединить анимации к тому или иному персонажу на своей карте, необходимо создать его в Roblox Studio. В левой вкладке выбрать Script (что бы быстро его найти введите в поиск Script)

16. В новом окне в поисковой строке введите «animation» и выберите его в окне чуть выше;

17. Вставьте скопированный ранее id анимации в поле «Animationid»

18. Пропишите этот код в скрипт (внимание: название файла анимации было изменено с «Animation» на «ahmed». Для нормальной работы скрипта можете либо поменять имя либо изменить в коде «Animation» на «ahmed»).

19. Проверяем в интерфейсе рядом с окном предпросмотра что бы не стояла галочка «Anchored»

20. Заходим на свою карту и проверяем работу анимации.
Видео инструкция
Animating Parts
Players can get feedback to whether or not their actions are doing anything with animations. This can be a tree shaking when hit, or pet cheerfully bouncing when fed. In this case, we’ll show you how to make a button that moves when the player clicks it.
Is This Tutorial For Me? »
This tutorial includes some basic scripting and part creation. If you’re new to creating scripts and parts, we recommend you follow along with Intro to Coding and Game Design first.
Tweening with Animations
One way of animating objects is using tweens. A tween, short for in-between, is a word for the process of changing a starting value to an ending value over a certain amount of time. Tweens can be used to change properties such as position, color, or rotation.
Project Setup
For this project, a tween will move an object from a starting position to a goal position.

Using Models »
If you’re using a model with many parts, pick one part to move (such as the button in this example), and put the MoveTween script as it’s child.
Adjusting the Move Tween
With the script added, you can customize it to suit the needs of your game. The button can be tweened to move in directions like forward and back, or up and down.
Changing Position
Remember, tweens transition from a starting value to a goal value. This script uses CFrame to move the button in a direction relative to its current position. That direction is controlled in Line 28 of the script.
On that line, a new CFrame is created using X, Y, and Z coordinates. In this example, the button moves relative to its Y axis.
For example, this line will move it relative to its X axis instead.
Tween Time and Distance
The script includes the following variables that affect the tween’s movement. Capitalized names like TWEEN_TIME are written specifically for this script to be modified.
Try changing the value of one variable below:
Script Notes and Limitations »
Tweening Other Properties
Most properties with a numerical data type can be tweened. This section includes some common properties, like rotation, that can be used to bring more player feedback into your game. Keep in mind, you can also tween multiple properties at once.
For a full list of properties, see the TweenService API page.
Rotation
For rotation, combine tweening and Cframes instead of just using Vector3. Rotation tweens can be used to make creatures wiggle when pet, or coins twirl as they’re picked up.
In the next script example, the creature’s position and rotation are both tweened when clicked to show how happy it is when being pet.
Using Animations in Games
Changing Default Animations
To change a default character animation, you’ll first need to locate the desired animation’s asset ID.
Catalog Animations
To use a catalog animation, locate its asset ID as outlined on the articles/catalog animations|Catalog Animations reference page.
Custom Animations
Changing a Default Animation
Once you have a valid animation asset ID, you can easily replace any of the default Roblox character animations:
Default Animation Reference »
| Character Action | Animate Script References |
|---|---|
| Cheer | animateScript.cheer.CheerAnim.AnimationId |
| Climb | animateScript.climb.ClimbAnim.AnimationId |
| Dance | animateScript.dance.Animation1.AnimationId animateScript.dance.Animation2.AnimationId animateScript.dance.Animation3.AnimationId animateScript.dance2.Animation1.AnimationId animateScript.dance2.Animation2.AnimationId animateScript.dance2.Animation3.AnimationId animateScript.dance3.Animation1.AnimationId animateScript.dance3.Animation2.AnimationId animateScript.dance3.Animation3.AnimationId |
| Fall | animateScript.fall.FallAnim.AnimationId |
| Idle | animateScript.idle.Animation1.AnimationId animateScript.idle.Animation2.AnimationId |
| Jump | animateScript.jump.JumpAnim.AnimationId |
| Laugh | animateScript.laugh.LaughAnim.AnimationId |
| Point | animateScript.point.PointAnim.AnimationId |
| Run | animateScript.run.RunAnim.AnimationId |
| Sit | animateScript.sit.SitAnim.AnimationId |
| Swim | animateScript.swim.Swim.AnimationId animateScript.swimidle.SwimIdle.AnimationId |
| Tools | animateScript.toollunge.ToolLungeAnim.AnimationId animateScript.toolnone.ToolNoneAnim.AnimationId animateScript.toolslash.ToolSlashAnim.AnimationId |
| Walk | animateScript.walk.WalkAnim.AnimationId |
| Wave | animateScript.wave.WaveAnim.AnimationId |
Using Animation Weight
Multiple animations may be used for the same action — note, for instance, that there are two default “idle” animations. When multiple animations exist for a character state, the Animate script will randomly choose which one to play, although the outcome can be influenced by changing the animation’s Weight value.
When assigning weight values, the probability of an animation being chosen is:
In the script below, this means that Animation1 will play ⅓ of the time the character is idle, while Animation2 will play ⅔ of the time.
Playing Animations Directly
In some cases you’ll need to play an animation directly from inside a script, for instance when the player presses a certain key, picks up a special item, etc.
Humanoids
Non-Humanoids
Animation Editor
The Animation Editor plugin allows you to design and publish custom animations on rigs.
Interface
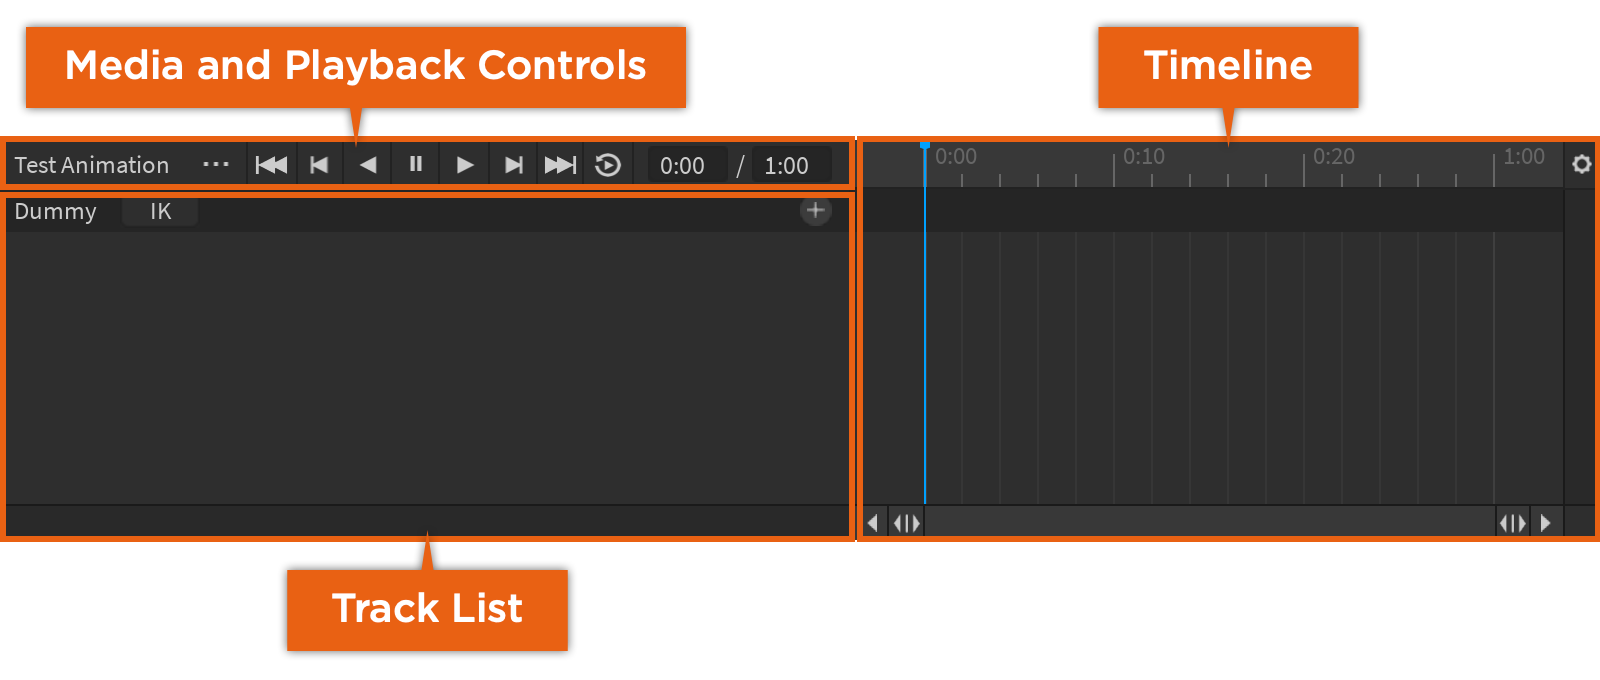
Media and Playback Controls
 | The name of the animation. | |||||||||||||||||
 |
 | A scrubber that marks the current frame position. | ||||||||
 | Time units that allow you to move the scrubber to a precise time unit. | ||||||||
 | A keyframe that marks the change in position or orientation of a part. | ||||||||
 | Either expands or contracts the time unit marks. | ||||||||
 |
 | The name of the rig. |
| Opens the Manage IK window. | |
 | Opens a pop-up menu of additional tracks you can add to the track list. |
 | The track displaying the name, position, and rotation of the part that has been moved or rotated to a new position or orientation. |
 |


