How to clone github repository ubuntu
Search Results
No Results
Filters
How to Install Git and Clone a GitHub Repository


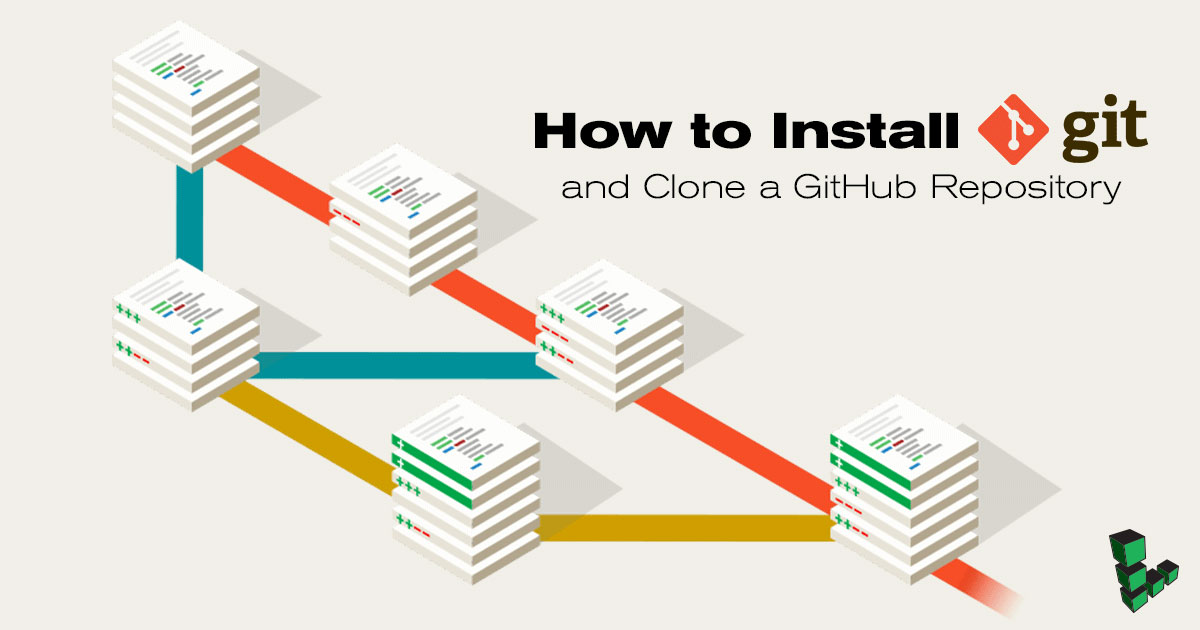
GitHub is a website that allows collaboration between developers using the Git version control system. With Git and GitHub, programmers from across the world can share ideas and code in an organized and up-to-date process.
Install and Configure Git
The directions below are for Debian or Ubuntu. For installation on Mac, Windows, or other Linux distributions, find instructions in the Git Source Control Management guide. While that guide focuses on Git, this guide focuses more on Git with GitHub.
Configure the username, replace First Last :
Configure the email, replace example@example.com :
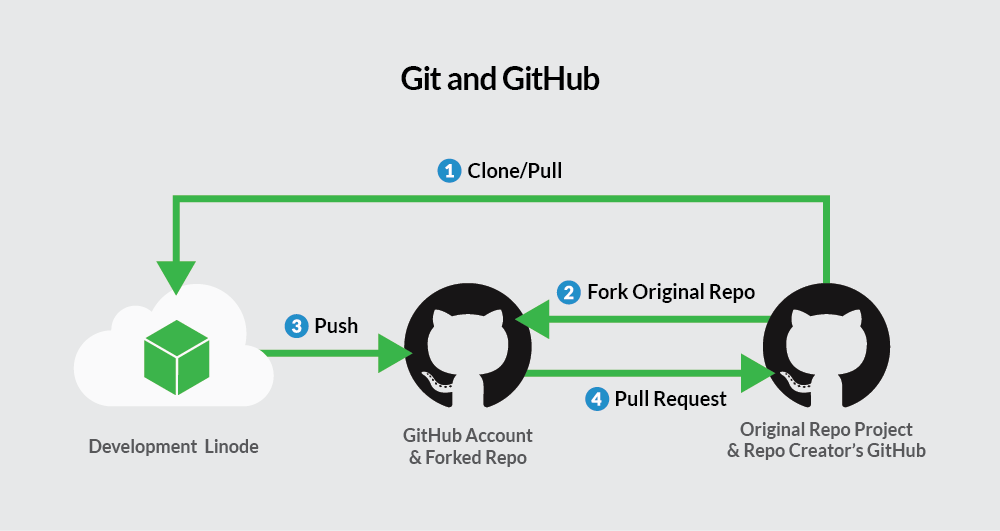
Now that Git has been installed, refer to the image below for help with using Git and GitHub together.


Clone a GitHub Test Repository
A repository, or repo, is a Git project. For tutorial purposes, there is a test repository setup on GitHub, which is listed below.

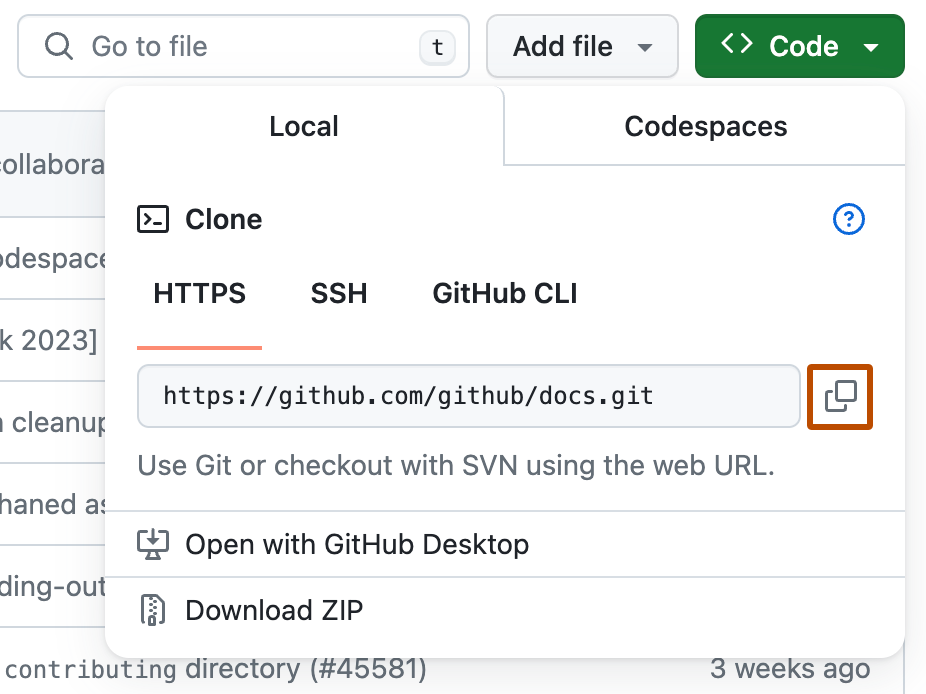
Copy the “HTTPS clone URL” link using the clipboard icon at the bottom right of the page’s side-bar, pictured below.
![]()
Change directories to the new
To ensure that your master branch is up-to-date, use the pull command:
Create a GitHub Account and Fork the Test Repo
To share new files or file revisions, you’ll need a GitHub account and a project fork. A fork is a copy of a repo held on your GitHub account.
Create a username on GitHub. At the “Welcome to GitHub” page, select the green, “Finish sign up” button at the bottom.
Select your username at the top right of the page, pictured below, which links to your profile.


You now have a copy of the repo on your GitHub account. Next, return to the terminal of the development Linode.
Push to the Forked Repo
Create files on the development Linode and push them to the forked repository on GitHub.
/test-repo-789 directory, create and checkout a new branch:
Create a project directory:
Create sample files:
Check the status of the Git project, with the git status command:
Add all the files in
/test-repo-789 to the Git staging area:
Push the new files to the forked repo on your new GitHub account. Replace SampleUser1234 below with your own GitHub username, and replace the repo name with the appropriate repo name if different:
Create a Pull Request Against the Original, Previously Cloned Repo
So far, Git was installed on a development Linode, a repo project was cloned to that Linode, a GitHub username was created, and a repo fork was copied to the GitHub user account. The final step is to ask the original repo project to accept the new revisions or sample files. This final process is called a pull request.
From the GitHub browser window, select your username from the top right of the page, pictured below.
At your GitHub profile, select the test-repo-789 in the center of the page, pictured below.

At the test-repo-789 page, select “branches”.

Under “Your branches”, select “New pull request”.

Check that the branch filters are set correctly.


Select the “Create pull request” button.

Congratulations, you have used Git and GitHub for file sharing and version control. There are still many Git commands to learn, but you are off to a great start.
More Information
You may wish to consult the following resources for additional information on this topic. While these are provided in the hope that they will be useful, please note that we cannot vouch for the accuracy or timeliness of externally hosted materials.
This page was originally published on Friday, February 6, 2015.
Cloning a repository
In this article
When you create a repository on GitHub.com, it exists as a remote repository. You can clone your repository to create a local copy on your computer and sync between the two locations.
About cloning a repository
You can clone a repository from GitHub.com to your local computer to make it easier to fix merge conflicts, add or remove files, and push larger commits. When you clone a repository, you copy the repository from GitHub.com to your local machine.
Cloning a repository pulls down a full copy of all the repository data that GitHub.com has at that point in time, including all versions of every file and folder for the project. You can push your changes to the remote repository on GitHub.com, or pull other people’s changes from GitHub.com. For more information, see «Using Git».
You can clone your existing repository or clone another person’s existing repository to contribute to a project.
Cloning a repository
On GitHub.com, navigate to the main page of the repository.
Above the list of files, click
Copy the URL for the repository.
. 
Change the current working directory to the location where you want the cloned directory.
Press Enter to create your local clone.
To learn more about GitHub CLI, see «About GitHub CLI.»
You can also use the GitHub URL to clone a repository.
Cloning an empty repository
An empty repository contains no files. It’s often made if you don’t initialize the repository with a README when creating it.
On GitHub.com, navigate to the main page of the repository.
To clone your repository using the command line using HTTPS, under «Quick setup», click
. To clone the repository using an SSH key, including a certificate issued by your organization’s SSH certificate authority, click SSH, then click
Alternatively, to clone your repository in Desktop, click
Change the current working directory to the location where you want the cloned directory.
Press Enter to create your local clone.
Troubleshooting cloning errors
When cloning a repository it’s possible that you might encounter some errors.
If you’re unable to clone a repository, check that:
Help us make these docs great!
All GitHub docs are open source. See something that’s wrong or unclear? Submit a pull request.
Как пользоваться GitHub на компьютере с Linux
GitHub — один из используемых сервисов размещения проектов для совместной разработки. Он поддерживает контроль версий, возможность отслеживания изменений кода, сравнение строк, а также он бесплатен.
В данной статье приведены примеры использования сервиса на компьютере под управлением операционных систем семейства Linux. Мы рассмотрим, как создать проект на локальном компьютере и залить его на сервис с помощью командной строки. Рассмотренные варианты использования git также можно применять на desktop системах, запустив окно терминала.
Установка git
Управление выполняется с помощью приложения git. Если его нет в системе, установку можно выполнить из репозитория.
Если используем CentOS / Red Hat:
yum install git-core
Если используем Ubuntu / Debian:
apt-get install git
Если мы хотим воспользоваться сервисом с компьютера Windows или Mac OS, необходимо скачать и установить desktop версию с официального сайта.
Синтаксис
Команды имеют следующий синтаксис:
* полный перечень опций, команд и аргументов можно получить командой man git.
Создание проекта на локальном компьютере
Прежде чем отправить проект на GitHub, создаем его на нашем компьютере. Для этого переходим в каталог с файлами проекта:
Инициализируем проект для git:
Мы получим ответ похожий на:
Initialized empty Git repository in /projects/.git/
Это означает, что репозиторий git создан.
Теперь добавим файлы в репозиторий:
* данной командой мы добавили папку и ее содержимое в репозиторий git.
Отправка данных на GitHub
Теперь можно отправить данные на сервис. Для этого у нас должна быть зарегистрированная учетная запись и создан репозиторий на GitHub.
Создание репозитория
Переходим на портал github.com и входим в систему или проходим несложную регистрацию:

Проходим процесс подтверждения, что мы не робот. Затем завершаем несколько шагов регистрации, нажимая Submit. В итоге мы получим письмо на адрес электронной почты, которую указали при регистрации. Необходимо будем подтвердить email, перейдя в письме по кнопке Verify email address.
Создаем репозиторий. Для этого кликаем по иконке профиля и переходим в раздел Your repositories:

И кликаем по кнопке New. В следующем окне даем название репозиторию и нажимаем Create repository:

Мы увидим страницу с путем к репозиторию:

Заливаем проект в репозиторий на GitHub
Добавляем комментарий к нашему проекту:
* где Очередное изменение проекта — произвольный комментарий; параметр -a указывает, что комментарий нужно применить ко всем измененным файлам.
Теперь подключаемся к созданному репозиторию:
git remote add origin https://github.com/dmosktest/project1.git
* где dmosktest — логин, который был указан при регистрации на github, а project1 — название, которое мы задали, когда создавали репозиторий.
* удалить удаленный репозиторий можно командой git remote rm origin.
Закидываем проект на GitHub:
git push origin master
* где master — ветка проекта (веток может быть несколько).
В нашем проекте на GitHub должны появиться файлы проекта:

Получение файлов с GitHub
Для загрузки на компьютер файлов, создаем каталог с проектом и переходим в него:
Проводим начальную настройку локального репозитория:
Подключаемся к удаленному репозиторию:
git remote add origin https://github.com/dmosktest/project1.git
Скачиваем проект командой:
git pull https://github.com/dmosktest/project1.git master
Клонирование проекта
Например, использую наш репозиторий:
git clone https://github.com/dmosktest/project1.git
* данная команда создаст в текущей папке каталог project1 и инициализирует его как локальный репозиторий git. Также загрузит файлы проекта.
Возможные ошибки
1. При попытке отправить данные на GitHub, получаем ошибку:
error: src refspec master does not match any.
error: failed to push some refs to ‘https://github.com/dmosktest/project1.git’
* где dmosktest/project1.git — путь к нашему репозиторию.
Причина: проект ни разу не был зафиксирован (закоммичен).
Решение: добавляем комментарий к нашему проекту:
How to Create and Clone a Repo in GitHub on Ubuntu 18.04
GitHub is a free repository hosting service, used as version control for web developers to download and push their code from their servers to other users.В In our previous article on Installing Git on Ubunto 18.04, we’ve instructed on how to add Git to your Ubuntu VPS server. We’ll continue on and show you how to add and clone a repo from GitHub to your server.

Preflight
Step 1: Set up a GitHub Account
If you haven’t done so already, make a Github.com account, it’s free! This is where you’ll be creating a repo and putting in files.  Once you’re in your GitHub account, click Create a repository (or New Repository), which will take you to a page where you can add details for your repo.
Step 2: Create a Repo
Fill out the details for your repo and be sure to take note your repo name, you’ll need it later in this tutorial.  If you are curious about the options on this screen, the README file is common for writing instructions to your users.  The licensing option can seem confusing but if you are questioning which one to choose you can check out this site to guide you. Once all details are in, click Create repository.
Once created, you’ll see two files in your repository if you chose the licensing and README file.
Step 3: Configuring Git per User
Step 4: Create A Directory
When you create a directory, you can use this space to sync newly written/edited code to your GitHub account. I’m going to call this environment git_environment and move into the directory using the cd command.
Step 5: Copy your GitHub URL
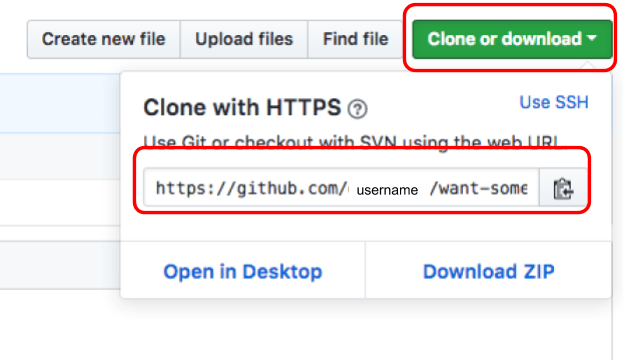
First, its necessary to clone or download our already pre-existing README and licensing file from our GitHub account. В Jump back to your GitHub account, click Clone or download and copy your GitHub link.
Step 6: Clone your Repo
In your terminal, you should find yourself in the GitHub directory. В We will first clone our repo with our copied GitHub URL and then change directories to our project name.
git clone https://github.com/username/want-some-java.git
By listing the want-some-java directory, you’ll see the two files in your repo, verifying that the cloning has worked.
Example Output: LICENSE В README.md
In our next tutorial, where will teach you how to edit/create a file on your server and push the script to your GitHub account.
Our talented Support Teams are full of experienced Linux technicians and System administrators who have an intimate knowledge of multiple web hosting technologies, especially those discussed in this article. We are always available to assist with any issues related to this article, 24 hours a day, 7 days a week 365 days a year.
If you are a Fully Managed VPS server, Cloud Dedicated, VMWare Private Cloud, Private Parent server or a Dedicated server owner and you are uncomfortable with performing any of the steps outlined, we can be reached via phone @800.580.4985, a chat or support ticket to assisting you with this process.
Related Articles:
About the Author: Alex Gorzen
Alex Gorzen has been helping others with technology his whole life. He played with computers even before he could read and wants to make sure his children share that same love as they grow up. In his free time, he enjoys gardening, building things, and learning new skills.

Join our mailing list to receive news, tips, strategies, and inspiration you need to grow your business
How to clone a private repository in Github
Git is an open-source, version control tool created in 2005 by developers working on the Linux operating system.
Cloning public repositories from Github or Gitlab using git is pretty straightforward, but when it comes to handle a private one, sometimes the situation is a bit tricky. You can either clone a private Github repository with a password like you normally would with any other online service, or do it with a token if you enabled 2-factor-authentication on your account or your organization uses SAML SSO. Alternatively, you can also clone private Github repo with SSH credentials.
In this article, we will show you how to clone a private repo using git with both a password and a Github token. We will also cover possible solutions to the common “Repository not found” error message when you try to clone a private repo from Github.
Prerequisites
In order to clone a git repository, you obviously need to have Git installed on your computer.
To check if Git is correctly installed on Windows or Linux, execute the following command :
Now that you know that Git is correctly installed, you’re ready to start cloning private Github repositories.
Clone private Github repo with username/password
In a few moment, you will be prompted for a password. Once you input the correct one, the output should look something like this :
Alternatively, if you don’t really care about exposing your password in plain text, you can put it directly in the repository URL :
Important: Private repositories cannot be cloned using git protocol.
You can configure git to specifically use HTTPS over other protocols by setting hub.protocol global flag to https. This will affect all git operations, including clone, fork, remote add and other operations that expand references to GitHub repositories as full URLs.
Clone private Github repo without typing password
Using an username/password pair, you have to input the password every time you want to push, pull or do operations to the repo. This behaviour can be annoying at times. Luckily, you can permanently store your password in git configuration file so you won’t be prompted ever again.
First, you have to enable the credentials helper by setting the credential.helper flag to store.
Clone private Github repo with SSH keys
To be able to clone from Github using SSH, you must generate an SSH keypair on your computer and add the public key to your GitHub account. Github documentation has extensively covered the process at Connecting to GitHub with SSH.
Next, you have to find the repository SSH URL from Github repo page.
Click Use SSH and the SSH URL should be displayed in a second.
This SSH URL works exactly the same way username/password pair does, except you don’t have to enter a password because it is already stored on your system in the form of a private key.
Clone private Github repo with token
In order to clone a Github repo with a 2FA-enabled Github account, you need to use a personal access token instead of entering the password. This Github token also allows you to login to organizations that uses SAML single sign-on – a technology used to control who can access which part of the repository.
Head over to Github dashboard. In the upper-right corner of any page, click your profile photo, then click Settings.
In the left sidebar, click Developer settings.
You will be redirected to Github Apps page. In the left sidebar, click Personal access tokens and then Generate new token.
You have to give your token a descriptive name and grant it the permission to access your repositories. To use your token to access repositories from the command line, select repo. Finally, click Generate Token button at the end of the webpage.
At this stage, you have to copy the token and securely save it elsewhere. For security reasons, after you navigate off the page, you will not be able to see the token again.
Treat your tokens like passwords and keep them secret because they are actually your password to some extent.
Once you have the token, you can use it just like a password. Whenever you are prompted for password, input that token. The token is pretty long and hard to remember, so I recommend you saving it to avoid type it again and again.
“Repository not found” error when clone a private repo
If you see this error message when cloning a private Github repo, it basically means that the repository does not exists (of course) and you don’t have the permission to access it.
On Linux, try clearing saved credentials from your system with the following command.
On a MacOS device, you can go to Keychain Access, find the credentials related to Git and Github, then change the username and password to the correct value.
If you still get the error, despite following all above solutions, you can try reinstalling git’s credential-manager using these commands.