How to use gradient set clip studio
How to use gradient set clip studio


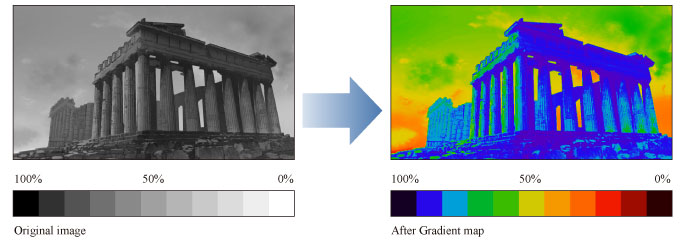
Gradient map [PRO/EX]
Select the [Edit] menu > [Tonal Correction] > [Gradient map] to open the dialog box. This converts the selected layer to the colors of the gradient, based on the density of the original colors.
Raster layer (color)
· For information on the settings in the [Gradient map] dialog box, please see the following section.
[Gradient map] dialog box
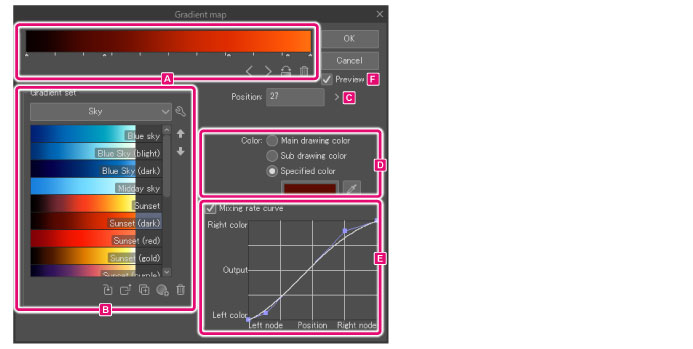
You can edit the gradient by moving the nodes.

(1) Color bar
A preview of the gradient.
(2) Node
Set the color of the gradient. You can create extra nodes by clicking an empty space.
Drag the nodes horizontally to adjust the gradient. Selected nodes are shown in blue.
To delete a node, drag it up or down from the gradient bar.
(3) Select left node
Switches to the next node on the left.
(4) Select right node
Switches to the next node on the right.
(5) Reverse gradient
Flips the gradient colors.
(6) Delete node
Deletes the selected node.
Here you can manage the gradient settings.
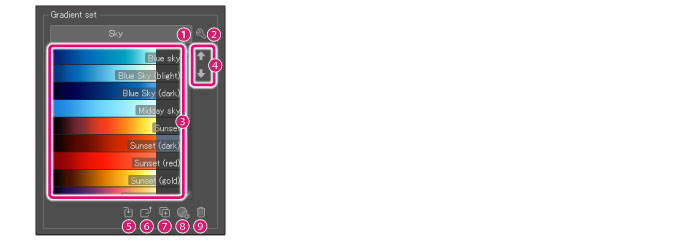
(1) Gradient set lists
Displays a list of gradient sets you can select from.
(2) Show Menu
Opens the gradient set menu.
Creates a new color gradient set.
Deletes the selected gradient set.
Duplicates the selected gradient set.
Settings of set
Change the name of the selected gradient set.
Register set as material
Import material set
Add the settings of the gradient displayed on the color bar to the list. The added gradient settings are displayed at the bottom of the list.
Deletes the selected gradient from the list.
Duplicates the selected gradient.
Change Gradient Name
Change the name of the selected gradient.
Overwrites the selected gradient with the gradient displayed in the color bar.
Apply to Gradient Settings
Shows the selected gradient in the color bar.
Import a gradient settings file from IllustStudio (extension: cgs).
Gradient settings file from IllustStudio (extension: cgs) cannot be imported on tablets/smartphonea/Macs with M1 chips.
· Clip Studio can be started from the [File] menu ([CLIP STUDIO PAINT] menu on macOS and Tablet) > [Open CLIP STUDIO]. For the Smartphone, select [Menu] > [Usage / Material / Work / Support].
(3) Gradient list
A list of gradients in the selected gradient set.
(4) Up/Down
Move the position of the gradient selected in the list up or down.
(5) Replace Gradient
Overwrites the selected gradient with the gradient displayed in the color bar.
(6) Apply to Gradient Settings
Shows the selected gradient in the color bar.
(7) Duplicate Gradient
Duplicates the selected gradient.
(8) Add Gradient
Adds the gradient displayed on the color bar to the list. The new gradient is added to the bottom of the list.
(9) Delete Gradient
Deletes the selected gradient from the list.
Indicates the position of the selected node.
Indicates the color of the selected node.

(1) Main drawing color
Uses the main drawing color as the node color. If you change the main drawing color with a color palette, the node color will also change.
(2) Sub drawing color
Set the sub drawing color for node color. If you change the sub drawing color with a color palette, the node color will also change.
(3) Specified color
Set a specified color for node color. Click the color indicator to open the [Color settings] dialog box.
(4) Obtain screen color [Windows/macOS]
You can use the eyedropper to pick a color from the screen as the specified color.
Allows you to adjust the change in color between the selected node and the node to the right.
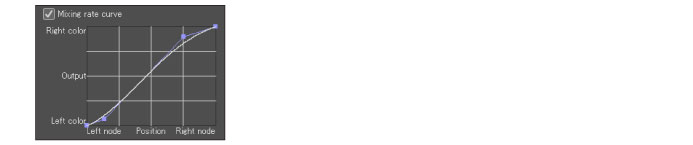
· The horizontal axis of the graph indicates the position of the nodes.
· The vertical axis of the graph indicates the color mixing ratio with respect to the node at the right. When the value is larger, the color between the nodes will be closer to the color of the node to the right. When the value is lower, the color between the nodes will be closer to the color of the selected node.
· Clicking on the curve allows you to add up to 16 points. which you can drag to adjust the mixing rate curve. To delete a control point, drag it outside the graph.
Turn this on to preview the results on the canvas.
[Material property] Dialog Box
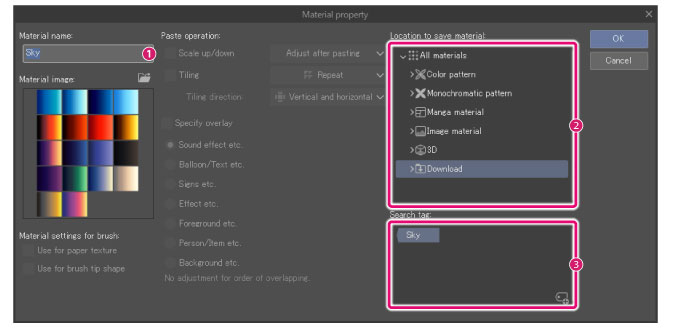
(1) Material name
Enter a name for the material.
(2) Location to save material
Click a folder in which to save the material. The saved location will be applied to the tree view in the [Materials] palette.
(3) Search tag
Here you can specify the search tag that will appear in the tag list.
Click plus icon in the lower right to create a new tag.
[Import material set] dialog box

(1) Search box
Enter a keyword to search for a gradient set image.
(2) Tag list
A list of tags assigned to materials. Clicking the button shows the [Gradient set list] from the specified settings in [Gradient set].
(3) Gradient set list
Displays the list of gradient sets.
(4) Show item check box
Shows a checkbox for each gradient set thumbnail in the list. You can select a material by clicking the checkbox.
(5) Large Thumbnails
Shows the gradient sets as large thumbnails.
(6) Small Thumbnails
Shows the gradient sets as small thumbnails.
(7) Detail View
Shows thumbnails and details of the gradient sets.
Using the Gradient Tool In CLIP STUDIO PAINT

Hello there! My name is Doug Hills, and I would like to welcome you to the Clip Studio Guide.
This is the first entry of an ongoing series of posts that will discuss how to use some of the tools and functions of CLIP STUDIO PAINT. They are intended to help new users become familiar and comfortable with what is available, whether they are new to CLIP STUDIO PAINT, or digital creation in general.
To start things off, I am going to talk about the Gradient Tool: what it is, how to use it, and how it can be adjusted to best suit how you would like to work in the program.
Before We Begin
I have a couple of quick notes before we get started, just to ensure that we all have a general understanding of terms and settings I will be talking about:


With that out of the way, let’s get started!
What are Gradients?
Gradients provide a smooth transition from one color to another. This can be from one color to another, color to transparent, or even a repeating pattern.
In this example, I used the Gradient Tool to create a blue sky for the background:

I could have left the scene as it is, but I decided to add a few clouds on top. This is a key thing to remember with the Gradient Tool (or any of the tools in the program, really): it can be used by itself, or as a base that you can then add your own touches to.

There is a second gradient on this piece that is not as noticeable: a light-to dark gradient placed on top of the character in this scene. I will remove the additional shadows and highlights to show what I mean:

By changing a Layer Blending mode (a topic I will be discussing in a future entry), I converted the gradient’s layer from Normal (which would have simply covered her flat colors) to Overlay (which subtly places the gradient over the flats.
To add depth, I switched to the Eraser Tool, and removed parts of the gradient: erasing along the lighter part of the gradient created shadows, while erasing along the darker area created highlights. I then placed additional layers to the piece to add in more highlights and shadows.
These are just two of the many ways gradients can be used in CLIP STUDIO PAINT. So, let’s talk about how we can make them, using the Gradient Tool.
Where is the Gradient Tool?
The Gradient Tool can be found on the Tools Window between the Fill and Figure Tools, or by pressing G on the keyboard.
Note: By default, this keyboard shortcut is also used by the Fill Tool. We can see which tool is active by noting which one is highlighted on the Tools Window.

Switching to the Sub Tools Window, we can find the collection of presets that come with the program. These include:

Adjusting The Gradient Tool
The Tool Property window provides the tweak and adjust the settings of each Sub Tool to our liking:

Here, we can find the default settings used by each Sub Tool. The settings shown will vary, depending on the preset chosen:

Shape: The type of gradient we would want to create:

Using the Gradient Tool
Now that we’ve talked about where the Gradient Tool is, and how we can adjust its Sub Tools, let’s start using it!
To place a gradient on the canvas:

With Elliptical Gradients, the size and shape of the gradient is first created. After releasing from the canvas, there is the option to adjust the ellipse’s angle. Hovering over the guide with the stylus (or clicking and dragging along the canvas on the iPad) will rotate the elliptical guide. When the desired angle is found, click on the canvas to set the gradient.

If all goes well, there should have a brand new gradient on the canvas, either on the selected layer, or on a brand new Gradient Layer.
About Gradient Layers
Gradient Layers are one of a series of a specialty layer types in CLIP STUDIO PAINT that provides us some flexibility when working with a gradient.
When a gradient is created on a basic raster layer, the gradient is fixed in place: The size, shape, and angle cannot be redone without undoing (or erasing) the gradient, and re-drawing it.
By comparison, a a gradient created on a Gradient Layer is still malleable. We can easily resize, reshape, and readjust the gradient as many times as we want, without any loss of quality.
In my sample piece, I created the sky on a Gradient Layer. So, if I wanted to change the way the sky looked, I could do so quickly and easily. To do this:
Once the Object Select Tool is active, the Gradient Layer’s Control Guide will appear. In the case of the sky, I used a linear gradient, so a linear Control Guide is now visible, with a starting and ending control points.

To reposition the beginning of the gradient, click and drag the starting control point to its new starting location. To adjust the length and angle of the gradient, click and drag the ending control point to its new position.

With circular gradients, a circular Control Guide will appear, with a starting focal point, and two control points. To reposition the gradient, click and drag the focal point to its new location. To resize, click and drag either of the two Control Points, until the gradient is at the desired size.

Bonus Note: If working with a patterned gradient, clicking and dragging the controls will adjust the pattern’s size, shape, and frequency.
With Elliptical Gradients, an elliptical Control Guide will appear with a starting focal point, and four Control Points. To reposition, click and drag the focal point to its new location. To resize, reshape, and and adjust the angle of the ellipse, click and drag each Control Point until the gradient is at its desired size and shape.

In addition to the Control Points, the Tool Property Window will have the settings used by the Sub Tool that created the gradient. We can now adjust the gradient’s settings after it has been made! These settings will vary depend on the Sub Tool used.
And finally, the Gradient Layer come with its own Layer Mask. If you are not familiar with Layer Masks, they allow us to non-destructively erase parts of a layer. So, if I were to erase away part of the gradient, and erase too much, I can fill that part back in, using the pen tool and a black foreground color.
(Incidentally, I used the Layer Mask to erase parts from the overlay gradient I placed on my character in the sample piece.)

CONCLUSION
So, this should give you a general understanding of how the Gradient Tool is used in CLIP STUDIO PAINT, and how it can be adjusted to fit what you wish to create. As you become more familiar with how it, I hope you will experiment further, and see what you can create with it, either on its own, or as a base to build upon.
Thanks for reading, and happy creating!
Doug Hills has been a commercial artist for close to 20 years, with work ranging from webcomics and comic books, to T-Shirt designs, storyboards, concept artwork, and so on. Doug also wrote Manga Studio For Dummies in 2008, and has created a series of YouTube tutorial videos on how to use the program.
How To Use Gradients And Gradient Maps In Clip Studio Paint
You’ve probably already meddled with and used gradients or gradient maps in Clip Studio Paint.
Gradients are something that I only use from time to time and recently I realized I didn’t know how to use them as much as I thought.
There’s actually a whole lot you can do with them, including creating your own gradients, edit pre-existing gradients or even import new ones!
You can also create different gradient effects by using different gradient shapes, changing the edge process as well as its angle!
To use a gradient, you can simply go to the toolbar and select the gradient tool or press the ‘G’ button on your keyboard as a shortcut!
There’s a lot of information to digest when choosing the Gradient tool, so I’ve written a whole guide, explaining each of the settings and options, so you can use gradients to their full potential and even create your own.
I’ll also go over how to use gradient maps, which can be very useful if you need to apply a gradient to a layer that you already drew on!
And if you’re interested in creating screentones in Clip Studio Paint, check out this article as well!
Using The Gradient Tool In Clip Studio Paint
The Gradient Tool in Clip Studio Paint is a lot more complex than it looks at first glance. It’s not a hard tool to use. It is pretty intuitive on how it works actually. But there’s little nuances and settings that you can play with to create different gradients and effects.
In fact, every time I use gradients in Clip Studio I learn something new. ‘Oh I can do this gradient this way? That makes everything so much easier!’
Note: If you haven’t purchased Clip Studio Paint yet, here’s a link to their website!
I find myself uttering these thoughts from time to time. You don’t need to know everything about a tool, especially if you want it for very simple tasks. Nevertheless, some of the things you’ll learn here will definitely come in handy sooner or later.
I’m going to go through each setting and option of the gradients tool and how to use them. But first, to reach the Gradient Tool, simply go to the toolbar and click the Gradient Icon, just below the paint bucket.
Alternatively, you can press ‘G’ on your keyboard and the gradient tool should be selected immediately.
As you can see there are already some default gradients that you can use. Foreground to transparent and Foreground to Background might be the most common to use.
All the other options can be very useful as well. The sky options are all very nice and, if you wish to, you can change their colors to something that fits better your background.
Note that some settings that I will mention below are not available with some of these custom gradients. Also, most of these will probably fit better to create a background than to add a specific effect to a selection you’ve made.
But, as always it depends on what you want and how you work. You might use these presets, but you can also just create your own or even download more!
Shape Of The Gradient
You can select different shapes, depending on what kind of gradient you want to do. For example, do you want to draw the sky,with the sun rising, applying different pink and orange tones? Then maybe a linear gradient works better. Do you want to apply a gradient to a round jewel in your drawing? Then Radial or Ellipse shapes might work better!
Edge Process
On the tool property window, you might notice there’s quite a lot of options for the edge process. Depending on which you chose, the gradient you’re applying will behave differently.
Step Of Angle
Ok, this one works very weirdly and I don’t really recommend it. The step of angle serves to reconfigure the angle of your gradient. It only works when using linear or ellipse shape for the gradient.
However, I recommend creating a Gradient layer instead. This way, you can edit your gradient whenever you want. You can change everything, from the angle to colors and even its shape! Let’s see how that works.
Drawing Target
There are two options here and it basically relates to what kind of layer you’ll be working on. If you want to draw a simple gradient and leave as it is, you can draw your gradient in a simple raster layer. However if you wish to edit the gradients you’re doing, then creating a gradient layer is the option you want!